8 Easy Steps to Set Up Magento 2 on CentOS 7

Magento is the leading e-commerce platform for small to enterprise level e-commerce businesses. It is an open-source CMS combining powerful functionality, extensibility and user-friendly interface. Its flexible module architecture, high performance and powerful marketing features make Magento the platform of choice for many e-commerce merchants.
At the same time Magento is not a trivial platform and thus requires technical expertise to properly set up, modify and manage it. So if you are new with Magento, start with reading the Magento tutorial for beginners . The next aspect you might be interested in now is how to set up Magento 2. In this article we’ll cover the process of Magento 2 installation on CentOS 7.
Step 1: Generate Magento Access Keys
It is necessary to generate authentication keys to access the repo.magento.com repository where Magento 2 and third-party Composer packages are stored.
- 1. Log in to the Magento Marketplace . If you don’t have an account, you can create it here .
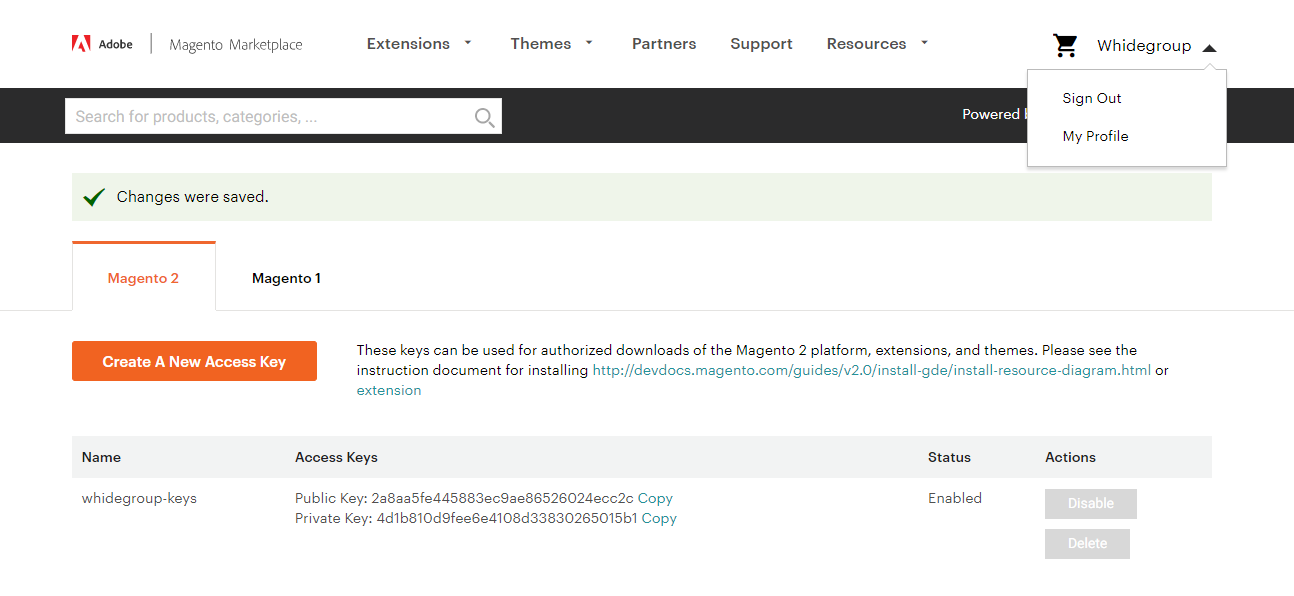
- 2. Click My Profile section in the top-right of the page.

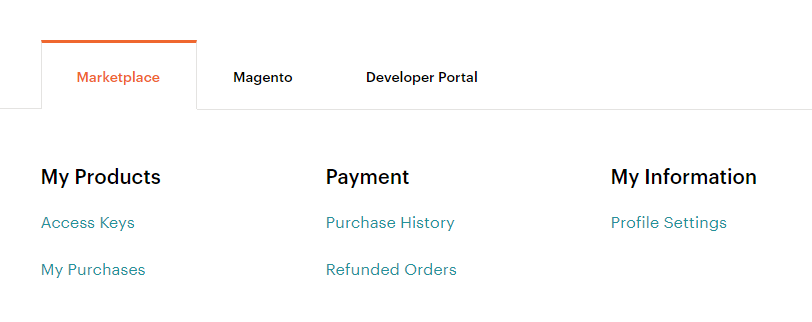
- 3. Click on Access Keys.

- 4. Select Create a New Access Key . Enter a specific name for the keys and click OK .

- 5. Now public and private keys are associated with your account, so you can manage them easily. Use the Public key as your username and the Private key as your password.

Magento 2.4.x is compatible with MySQL 5.7 and 8.0, MariaDB 10.x. The full list of Magento stem requirements can be found here
Login to MySQL:
mysql -u root -pExecute the following commands to create a database, user and grant privileges to this user in a newly created database:
CREATE DATABASE magento2; CREATE USER 'magento'@'localhost' IDENTIFIED BY 'P4ssvv0rD'; GRANT ALL ON magento2.* TO magento@localhost IDENTIFIED BY 'P4ssvv0rD';Pay attention that starting from Magento 2.3.x, Magento requires a unique user for Magento installation instead of a default root user.
Then flush the privileges to reload the grant tables in the MySQL database enabling the changes to take effect without reloading or restarting MySQL service and exit.
FLUSH PRIVILEGES; EXIT;Add nginx user to magento group and change access permissions to /opt/magento so Nginx can access our Magento installation:
sudo usermod -a -G magento nginx sudo chmod 750 /opt/magentoStep 3: Set Up PHP Extensions
Install all the necessary PHP extensions using this command:
sudo yum install php-mysql php-opcache php-xml php-mcrypt php-gd php-soap php-redis php-bcmath php-intl php-mbstring php-json php-iconv php-fpm php-zipWhen installation is finished, set up recommended PHP parameters modifying php.ini file with sed:
sudo sed -i "s/memory_limit = .*/memory_limit = 756M/" /etc/php.ini sudo sed -i "s/upload_max_filesize = .*/upload_max_filesize = 256M/" /etc/php.ini sudo sed -i "s/zlib.output_compression = .*/zlib.output_compression = on/" /etc/php.ini sudo sed -i "s/max_execution_time = .*/max_execution_time = 18000/" /etc/php.ini sudo sed -i "s/;date.timezone.*/date.timezone = UTC/" /etc/php.ini sudo sed -i "s/;opcache.save_comments.*/opcache.save_comments = 1/" /etc/php.d/10-opcache.iniStep 4: Install Composer
Composer is a tool for dependencies management in PHP. It allows you to declare the libraries your project depends on and to manage (install/update) them. When you are ready, download Composer and install it.
curl -sS https://getcomposer.org/installer | php sudo mv composer.phar /usr/local/bin/composerIf you’d like to check Composer installed or not, simply type:
composer -vOutput will be:

Step 5: Configure PHP FPM
The next step in our tutorial is PHP configuration and set up of FPM for our magento user.
Create a file /etc/php-fpm.d/magento.conf and write the following:
[magento] user = magento group = nginx listen.owner = magento listen.group = nginx listen = /run/php-fpm/magento.sock pm = ondemand pm.max_children = 50 pm.process_idle_timeout = 10s pm.max_requests = 500 chdir = /Save file and restart PHP FPM, so changes take effect:
sudo systemctl restart php-fpmStep 6: Download and Install Magento 2 Pack
There are a few ways of where to download and how to install Magento 2. We offer you to download the Magento 2 pack from the official Magento website and install it using Composer.
Switch to magento user:
sudo su - magentoStart by uploading Magento files to /opt/magento/public_html catalog:
composer create-project --repository-url=https://repo.magento.com/ magento/project-community-edition /opt/magento/public_htmlDuring project creation Composer will ask you to enter an authentication key and save it to the auth.json file.
Authentication required (repo.magento.com): Username: 2a8aa5fe445883ec9ae86526024ecc2c Password: 4d1b810d9fee6e4108d33830265015b1 Do you want to store credentials for repo.magento.com in /opt/magento/.config/composer/auth.json ? [Yn]Once the project is created, we can start the installation. We will use the following options:
- Base and Base secure urls are set as https://example.com. Please, change them to your domain name.
- Magento admin details:
- ○ First and last name John Doe
- ○ Email - john@example.com
- ○ Username is john and password is j0hnP4ssvv0rD
- Database name magento2, username magento, password P4ssvv0rD and database server are located on the same host as a web server
- en_US, American english as a default language
- USD as a default currency
- America/Chicago timezone
Go to ~/public_html catalog in Magento:
cd ~/public_htmlRun the following command to begin the installation:
php bin/magento setup:install --base-url=https://example.com/ \ --base-url-secure=https://example.com/ \ --admin-firstname="John" \ --admin-lastname="Doe" \ --admin-email="john@example.com" \ --admin-user="john" \ --admin-password="j0hnP4ssvv0rD" \ --db-name="magento2" \ --db-host="localhost" \ --db-user="magento" \ --currency=USD \ --timezone=America/Chicago \ --use-rewrites=1 \ --db-password="P4ssvv0rD"Please, don’t forget to change the password to a more secure one.
When the installation finishes successfully, you will see the message with URI for the Magento admin panel.
[Progress: 485 / 485] [SUCCESS]: Magento installation complete. [SUCCESS]: Magento Admin URI: /admin_1csalp Nothing to import.Step 7: Configure Magento Crontab
Magento uses cron jobs to plan and execute tasks like reindexing, sending notifications, emails and more. To create a Magento crontab you need to execute the following command as a magento user:
php ~/public_html/bin/magento cron:installWe can check if crontab is installed properly running crontab -|.
#~ MAGENTO START adc062915d7b30804a2b340095af072d * * * * * /usr/bin/php /opt/magento/public_html/bin/magento cron:run 2>&1 | grep -v "Ran jobs by schedule" >> /opt/magento/public_html/var/log/magento.cron.log * * * * * /usr/bin/php /opt/magento/public_html/update/cron.php >> /opt/magento/public_html/var/log/update.cron.log * * * * * /usr/bin/php /opt/magento/public_html/bin/magento setup:cron:run >> /opt/magento/public_html/var/log/setup.cron.log #~ MAGENTO END adc062915d7b30804a2b340095af072dStep 8: NGINX Setup
All that is left is to create a new server instance (cloud or dedicated) for our Magento installation. We will use the default NGINX configuration that comes with Magento.
/etc/nginx/conf.d/example.com.conf upstream fastcgi_backend { server unix:/run/php-fpm/magento.sock; } server { listen 80; server_name example.com www.example.com; include snippets/letsencrypt.conf; return 301 https://example.com$request_uri; } server { listen 443 ssl http2; server_name www.example.com; ssl_certificate /etc/letsencrypt/live/example.com/fullchain.pem; ssl_certificate_key /etc/letsencrypt/live/example.com/privkey.pem; ssl_trusted_certificate /etc/letsencrypt/live/example.com/chain.pem; include snippets/ssl.conf; return 301 https://example.com$request_uri; } server { listen 443 ssl http2; server_name example.com; ssl_certificate /etc/letsencrypt/live/example.com/fullchain.pem; ssl_certificate_key /etc/letsencrypt/live/example.com/privkey.pem; ssl_trusted_certificate /etc/letsencrypt/live/example.com/chain.pem; include snippets/ssl.conf; set $MAGE_ROOT /opt/magento/public_html; set $MAGE_MODE developer; # or production access_log /var/log/nginx/example.com-access.log; error_log /var/log/nginx/example.com-error.log; include /opt/magento/public_html/nginx.conf.sample; }Reload NGINX so the changes take effect.
sudo systemctl reload nginxNow you are ready to access your Magento admin panel
https://example.com/admin_1csalp using credentials entered for admin during Magento installation.
Final Thoughts
Being one of the best CMS for e-commerce business, Magento provides powerful functionality and options for e-commerce merchants to run and grow their businesses. Each step in the creation of an e-commerce store requires concentration and result orientation. So there is nothing complicated in Magento installation on CentOS 7 too, if you follow the instructions offered in this guide. Do not rush and pay attention to all the details. This is the starting point of your Magento e-commerce journey.
