How to Create Order Attribute Programmatically In Magento 2

Step 1: Create an UpgradeData File
This blog helps the admin to collect data of order attribute value which is selected by the customer.
Collecting additional information about customers is important. As a Magento 2 store owner, you can easily do it by adding a custom attribute to the order. Magento 2 Order Attributes is the perfect solution that can help you with that.
By using the following steps you can easily create a custom order attribute.
Programmatically, you can create Order Attribute Using InstallData File..
Practically, there are two main ways to add an order attribute (a new column) to order via an upgrade script.
1. Using $setup->getConnection()->addColumn() app/code/Mageants/SalesOrder/Setup/UpgradeSchema.php
|
<?php namespace Mageants\SalesOrder\Setup; use Magento\Framework\Setup\UpgradeSchemaInterface;use Magento\Framework\Setup\SchemaSetupInterface;use Magento\Framework\Setup\ModuleContextInterface; class UpgradeSchema implements UpgradeSchemaInterface{/*** Upgrades DB schema for a module** @param SchemaSetupInterface $setup* @param ModuleContextInterface $context* @return void*/public function upgrade(SchemaSetupInterface $setup, ModuleContextInterface $context){$setup->startSetup(); $quote = 'quote';$orderTable = 'sales_order';//Quote table $setup->getConnection()->addColumn($setup->getTable($quote),'custom_order_attribute',['type' => \Magento\Framework\DB\Ddl\Table::TYPE_TEXT,'length' => 255,'comment' =>'Custom Order Attribute']); //Order table$setup->getConnection()->addColumn($setup->getTable($orderTable),'custom_order_attribute',['type' => \Magento\Framework\DB\Ddl\Table::TYPE_TEXT,'length' => 255,'comment' =>'Custom Order Attribute']); $setup->endSetup();}} |
2. Using Quote and Sale Setup Factory
|
<?php namespace Mageants\SalesOrder\Setup; use Magento\Framework\Setup\ModuleContextInterface;use Magento\Framework\Setup\ModuleDataSetupInterface;use Magento\Framework\Setup\UpgradeDataInterface;use Magento\Quote\Setup\QuoteSetupFactory;use Magento\Sales\Setup\SalesSetupFactory; class UpgradeData implements UpgradeDataInterface{/*** @var QuoteSetupFactory*/protected $quoteSetupFactory; /*** @var SalesSetupFactory*/protected $salesSetupFactory; /*** @param QuoteSetupFactory $quoteSetupFactory* @param SalesSetupFactory $salesSetupFactory*/public function __construct(QuoteSetupFactory $quoteSetupFactory,SalesSetupFactory $salesSetupFactory) {$this->quoteSetupFactory = $quoteSetupFactory;$this->salesSetupFactory = $salesSetupFactory;}/*** Upgrades DB for a module** @param ModuleDataSetupInterface $setup* @param ModuleContextInterface $context* @return void*/public function upgrade(ModuleDataSetupInterface $setup, ModuleContextInterface $context){/** @var \Magento\Quote\Setup\QuoteSetup $quoteInstaller */$quoteInstaller = $this->quoteSetupFactory->create(['resourceName' => 'quote_setup', 'setup' => $setup]); /** @var \Magento\Sales\Setup\SalesSetup $salesInstaller */$salesInstaller = $this->salesSetupFactory->create(['resourceName' => 'sales_setup', 'setup' => $setup]); $setup->startSetup(); //Add multiple attributes to quote $entityAttributesCodes = ['custom_order_attribute' => \Magento\Framework\DB\Ddl\Table::TYPE_TEXT,'custom_order_attribute1' => \Magento\Framework\DB\Ddl\Table::TYPE_TEXT ]; foreach ($entityAttributesCodes as $code => $type) { $quoteInstaller->addAttribute('quote', $code, ['type' => $type, 'length'=> 255, 'visible' => false, 'nullable' => true,]);$salesInstaller->addAttribute('order', $code, ['type' => $type, 'length'=> 255, 'visible' => false,'nullable' => true, 'grid' => true,]);$salesInstaller->addAttribute('invoice', $code, ['type' => $type, 'length'=> 255, 'visible' => false, 'nullable' => true,]);} $setup->endSetup();}} |
Magento 2.3.4 and later do not support above format:
app/code/Mageants/SalesOrder/etc/db_schema.xml
|
<?xml version="1.0"?> <schema xmlns:xsi="http://www.w3.org/2001/XMLSchema-instance"xsi:noNamespaceSchemaLocation="urn:magento:framework:Setup/Declaration/Schema/etc/schema.xsd"><table name="sales_order" resource="sales" engine="innodb" comment="Sales Order"><column xsi:type="varchar" name="custom_order_attribute" nullable="true" length="255" comment="Custom Order Attribute"/></table><table name="sales_order_grid" resource="sales" engine="innodb" comment="Sales Order"><column xsi:type="varchar" name="custom_order_attribute" nullable="true" length="255" comment="Custom Order Attribute"/></table><table name="quote" resource="checkout" engine="innodb" comment="Quote"><column xsi:type="varchar" name="custom_order_attribute" nullable="true" length="255" comment="Custom Order Attribute"/></table><table name="sales_invoice" resource="sales" engine="innodb" comment="Sales Invoice"><column xsi:type="varchar" name="custom_order_attribute" nullable="true" length="255" comment="Custom Order Attribute"/></table></schema> |
This will create the custom order attribute ‘custom_order_attribute’ in the sales_order table, sales_order_grid, Invoice and Quote table.
To create in the sales_order_grid table we are using ‘grid’ => true.
Step 2: Save the Order Attribute Using Observer
Next, we need to set value for this attribute. We will use sales_order_save_after event to set value when the order is created. So we will create new events.xml file in app/code/Mageants/SalesOrder/etc/events/xml with the following content.
|
<?xml version="1.0" ?> <config xmlns:xsi="http://www.w3.org/2001/XMLSchema-instance" xsi:noNamespaceSchemaLocation="urn:magento:framework:Event/etc/events.xsd"><event name="sales_order_save_after"><observer instance="Mageants\SalesOrder\Observer\Sales\OrderSaveAfter" name="set_custom_order_attribute"/></event></config> |
Here we are using sales_order_save_after event to update the order attribute and save it for value of this attribute.
Step 3: To create actual code file
app/code/Mageants/SalesOrder/Observer/Sales/OrderSaveAfter.php
|
<?php namespace Mageants\SalesOrder\Observer\Sales; class OrderSaveAfter implements \Magento\Framework\Event\ObserverInterface{/*** @var \Magento\Catalog\Model\ProductRepository*/protected $productRepository; public function __construct(\Psr\Log\LoggerInterface $logger,\Magento\Catalog\Model\ProductRepository $productRepository) {$this->logger = $logger;$this->productRepository = $productRepository;} /*** Execute observer** @param \Magento\Framework\Event\Observer $observer* @return void* @throws \Magento\Framework\Exception\NoSuchEntityException*/public function execute(\Magento\Framework\Event\Observer $observer) {$order= $observer->getData('order');$order->setCustomOrderAttribute("Yes");$order->save();}} |
We set the value of the custom order attribute and saved the order object.
Step 4: Sync sales_order table and sales_order_grid table
Now We have to create di.xml file to copy or sync values from sales_order to sales_order_grid table.
app/code/Mageants/SalesOrder/etc/di.xml
|
<?xml version="1.0"?> <config xmlns:xsi="http://www.w3.org/2001/XMLSchema-instance"xsi:noNamespaceSchemaLocation="urn:magento:framework:ObjectManager/etc/config.xsd"><virtualType name="Magento\Sales\Model\ResourceModel\Order\Grid" type="Magento\Sales\Model\ResourceModel\Grid"><arguments><argument name="columns" xsi:type="array"><item name="custom_order_attribute" xsi:type="string">sales_order.custom_order_attribute</item></argument></arguments></virtualType></config> |
Step 5: Show Custom Order Attribute in Grid
Next, we need to tell the sales_order_grid.xml UI component to create a new column for our new attribute. So create a new xml file.
app/code/Mageants/SalesOrder/view/adminhtml/ul_component/sales_order_grid.xml
It’s following content.
|
<?xml version="1.0" encoding="UTF-8"?> <listing xmlns:xsi="http://www.w3.org/2001/XMLSchema-instance"xsi:noNamespaceSchemaLocation="urn:magento:module:Magento_Ui:etc/ui_configuration.xsd"><columns name="sales_order_columns"><column name="custom_order_attribute"><argument name="data" xsi:type="array"><item name="config" xsi:type="array"><item name="filter" xsi:type="string">textRange</item><item name="bodyTmpl" xsi:type="string">ui/grid/cells/html</item><item name="label" xsi:type="string" translate="true">My Order Attribute</item></item></argument></column></columns></listing> |
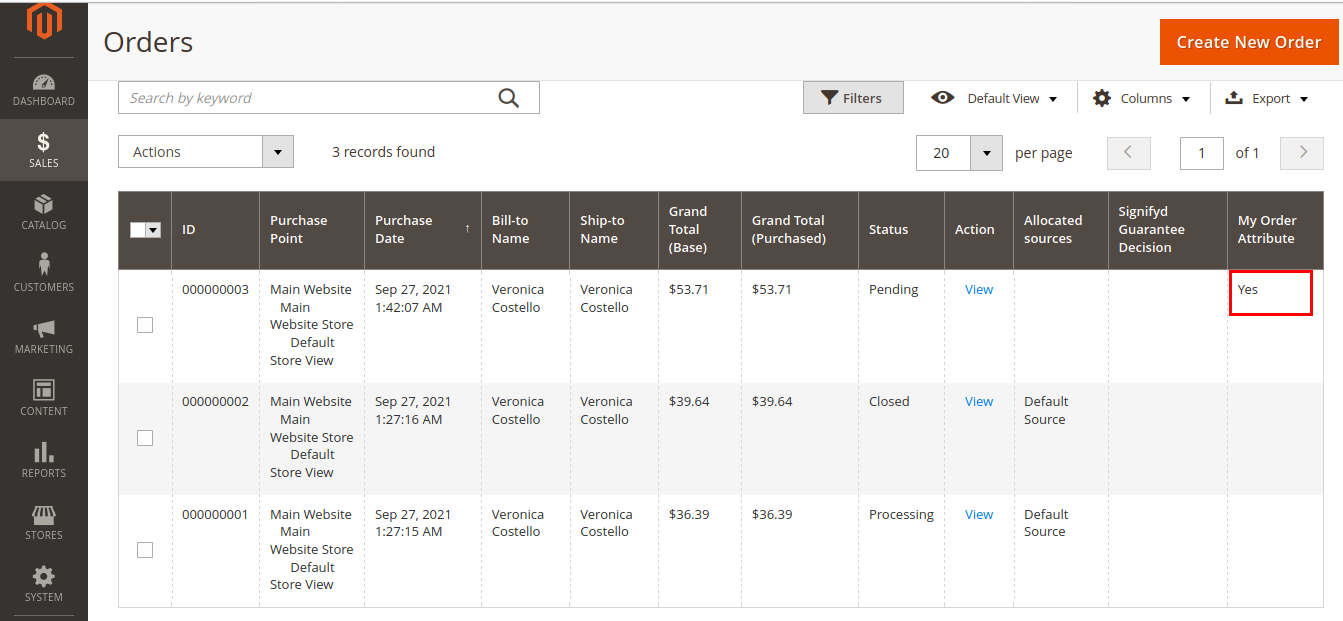
Now after placing order you can see My Order Attribute table and it’s value is “Yes”.

Conclusion
For Using this blog you create order attribute programmatically in Magento 2.
We hope that this tutorial is helpful and you can follow it easily.
