
How To Create Custom Theme In Magento 2
There are various number of improvements to the way themes are managed and set up in Magento 2. One of the most significant improvements of fallback system in Magento 2 works in a similar way to Magento 1.x. Along with this, another advantage includes selecting unlimited parent themes to inherit from or fallback to your theme.
Magento provides two default themes for the users which are known as Blank and Luma themes. However, if the users have installed the Magento with the help of sample data then the theme applied after installation is luma theme. But if no sample data is used at the time of installation then the Blank theme is installed by default. If there is nothing in particular that you want to change then you can use either a Blank or Luma theme for your storefront. If you have something that you want to change for your store then you can easily create them by inheriting Magento 2 Create Theme Based On Luma or Blank default themes.
With the help of custom themes, you can easily improve the areas like a storefront and Magento 2 admin, by simply utilizing a combination of custom designs, templates, images or styles development. If you have any queries regarding, How To Customize Luma Theme In Magento 2, then you can look at the following high-level steps to create a theme and change their styles:

- Make the set up of your Magento application to the developer mode.
- In the file system, add a new theme which is inheriting from the default themes of Magento Luma or Blank.
- You must apply your theme.
- After that, you must decide which CSS compilation mode you will use.
- Finally, you can customize styles.
We can also Create Custom Templates, with the help of the following given steps;
- Firstly, you must locate the template which is associated with the block/page that you want to change with the help of template hints.
- According to the template storing convention, you can easily copy the located template to your theme folder.
- Finally, make the required changes and your custom template is created.
To cover the basic front-end Magento 2 custom theme development, you must follow the given steps;
- Requirements for Magento 2 theme development
- Create theme directory
- Declare your Magento 2 theme
- Composer packages
- Registration.php file
- Directory structure in Magento 2 theme development
- Apply and configure theme in Magento 2 admin
Requirements for Magento 2 Theme Development
Before creating a custom theme for Magento 2, you must be sure that the following requirements are fulfilled;
- You must have some experience in Magento coding.
- You must have a little bit of knowledge about Magento 2.
- You must have access to both the front-end and back-end of the smoothly running Magento 2 that is installed on your local host.
Create Theme Directory
To create directory for your Magento 2 theme, you firstly need to go to the “your Magento 2 root directory” and then select app, followed by design, and finally select frontend. Under the section of frontend directory, you can easily create a new directory that can be done as: /app/design/frontend/(theme vendor name). Now, you have to create a directory for your Magento 2 theme: /app/design/frontend/(theme vendor name)/m2-theme.
After creating this structure, you must declare your Magento 2 theme so that you can set your theme as a current theme in your Magento 2 backend.
Declare your Magento 2 theme
Now you have to create the theme.xml file for the declaration of your Magento 2 theme through the following code:
       <theme xmlns:xsi="http://www.w3.org/2001/XMLSchema-instance"                                 xsi:noNamespaceSchemaLocation="urn:magento:framework:Config/etc/theme.xsd">
        <title>m2-theme </title>
        <parent>Magento/Luma </parent>
        <media>
       <preview_image>media/m2-theme-image.jpg </preview_image>
        </media>
        </theme>
The <title> tag present in the above code, should be inserted with the name of your theme. And in the <parent> tag you can specify the parent theme for the fallback.
In the <preview_image> tag, you need to declare a theme image. This thumbnail image will be shown in the Magento 2 admin page. This thumbnail image will be located at the location of app/design/frontend/(theme vendor name)/m2-theme/media/m2-theme-image.jpg. You must make sure that your thumbnail image is in the right location, else there will be an error when you visit your theme page in Magento 2 admin.
Composer Package
Composer is, basically, a tool in PHP for dependency management. Moreover, it allows you to declare the libraries that your project depends on. Along with this, it will also manage the installation or update for you.
However, you must need to include a composer.json file to your theme directory, so that you can easily distribute your theme as a package.
Registration.PHP file
To register your theme in Magento 2 you can easily use this file for adding the following content.
Directory Structure in Magento 2 Theme Development
After you have finished the declaration and registration of your theme, you need to create the directory structure for your theme styles, template and layout files. With the help of the following directory codes, you can see how your theme directory must look like.
/app/design/frontend/Mageants/m2-theme/theme.xml /app/design/frontend/Mageants/m2-theme/registration.php /app/design/frontend/Mageants/m2-theme/composer.json /app/design/frontend/Mageants/m2-theme/media /app/design/frontend/Mageants/m2-theme/media/m2-theme-image.jpg /app/design/frontend/Mageants/m2-theme/web /app/design/frontend/Mageants/m2-theme/web/css /app/design/frontend/Mageants/m2-theme/web/css/source /app/design/frontend/Mageants/m2-theme/web/css/fonts /app/design/frontend/Mageants/m2-theme/web/css/images /app/design/frontend/Mageants/m2-theme/web/css/js /app/design/frontend/Mageants/m2-theme/etc /app/design/frontend/Mageants/m2-theme/etc/view.xml /app/design/frontend/Mageants/m2-theme/Magento_Theme /app/design/frontend/Mageants/m2-theme/Magento_Theme/layout /app/design/frontend/Mageants/m2-theme/Magento_Theme/layout/default.xml
In the above shown directory structure, you need to replace Mageants with your own theme vendor name.
Apply and Configure Theme in Magento 2 Admin
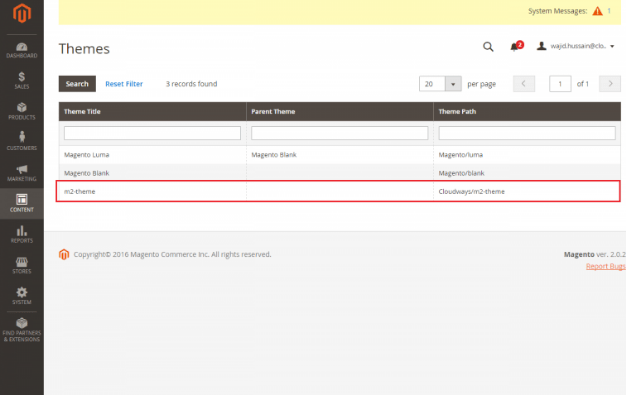
After you have added your theme to the file system, everything is ready for you to activate your theme and apply it to your storefront. You must go to the Magento 2 backend, and then visit content>design>themes. After that, make sure that your theme appears on the list.
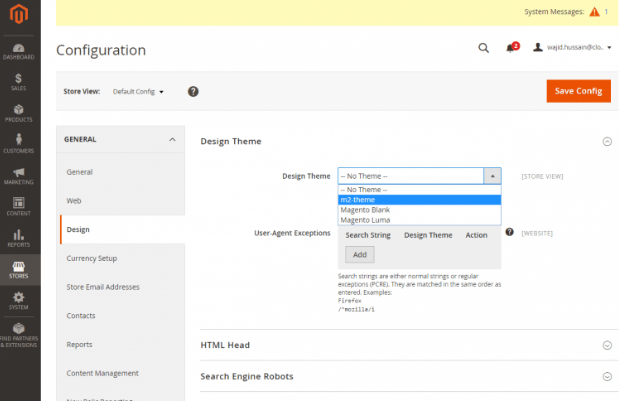
When your theme has appeared on the list, then you must go to stores>configuration>design, so that you can easily select your newly created theme. After you have selected the theme, just click on the “Save Configuration” button. And finally, clear the cache.
Conclusion:
At the time of installation of Magento 2, if the sample data is used then the theme available after installation is known as Luma theme, while if the sample data is not used at the time of installation of the Magento 2 then Blank theme is applied by default. With the help of the customized theme, the users can experience improved storefront, Magento 2 admin, etc through the combination of templates, custom designs, images or styles development.
