


How to Add Product to cart using Ajax Programmatically in Magento 2
Magento 2 AJAX Add to Cart Extension comes with the quickest and smoothest add-to-cart process which will allow customers to add products to their cart without refreshing the page.
Magento 2 Ajax Add To Cart
This module saves the customers’ time by allowing them to collectively purchase products without any delay or refreshing the page. It adds the item to the cart while customers are still browsing for more items. You can also enable other useful features in Magento quick add to cart module such as dialogue box, display related products and animations to facilitate your customers. Products can be added to shopping cart immediately without reloading the page.
Magento 2 add to cart popup or magento 2 popup after add to cart
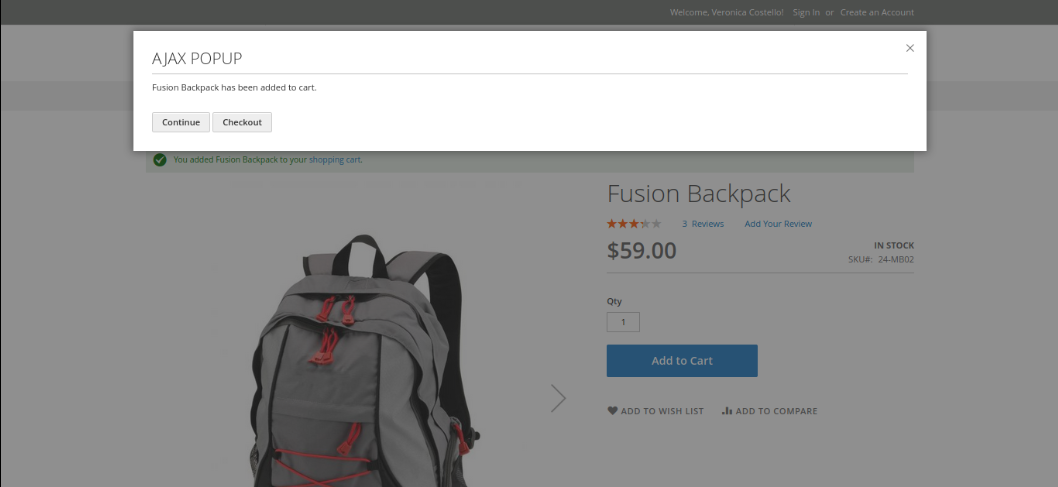
The AJAX Add To Cart extension allows customer to customizing the pop-up window. Display product image, cart qty, cart subtotal, quantity box, countdown timer and go-to checkout button in the pop-up. Display related or cross-sell products in the popup to motivate customers to add more products to cart. To add simple popup when click on Add to Cart ,Follow below steps:
Step 1:
Create app/code/Mageants/Blog/view/frontend/requirejs-config.js
|
var config = { config: { mixins: { 'Magento_Catalog/js/catalog-add-to-cart': { 'Mageants_Blog/js/catalog-add-to-cart': true } } } }; |
Step 2:
Create app/code/Mageants/Blog/view/frontend/web/js/catalog-add-to-cart.js
|
define([ 'jquery', 'mage/translate', 'underscore', 'Magento_Catalog/js/product/view/product-ids-resolver', 'Magento_Catalog/js/product/view/product-info-resolver', 'jquery-ui-modules/widget' ], function ($, $t, _, idsResolver, productInfoResolver) { 'use strict'; return function (widget) { $.widget('mage.catalogAddToCart',widget, { options: { processStart: null, processStop: null, bindSubmit: true, minicartSelector: '[data-block="minicart"]', messagesSelector: '[data-placeholder="messages"]', productStatusSelector: '.stock.available', addToCartButtonSelector: '.action.tocart', addToCartButtonDisabledClass: 'disabled', addToCartButtonTextWhileAdding: '', addToCartButtonTextAdded: '', addToCartButtonTextDefault: '', productInfoResolver: productInfoResolver }, ajaxSubmit: function (form) { var self = this, productIds = idsResolver(form), productInfo = self.options.productInfoResolver(form), formData; $(self.options.minicartSelector).trigger('contentLoading'); self.disableAddToCartButton(form); formData = new FormData(form[0]); $.ajax({ url: form.attr('action'), data: formData, type: 'post', dataType: 'json', cache: false, contentType: false, processData: false, /** @inheritdoc */ beforeSend: function () { if (self.isLoaderEnabled()) { $('body').trigger(self.options.processStart); } }, /** @inheritdoc */ success: function (res) { var eventData, parameters; $(document).trigger('ajax:addToCart', { 'sku': form.data().productSku, 'productIds': productIds, 'productInfo': productInfo, 'form': form, 'response': res }); if (self.isLoaderEnabled()) { $('body').trigger(self.options.processStop); } if (res.backUrl) { eventData = { 'form': form, 'redirectParameters': [] }; // trigger global event, so other modules will be able add parameters to redirect url $('body').trigger('catalogCategoryAddToCartRedirect', eventData); if (eventData.redirectParameters.length > 0 && window.location.href.split(/[?#]/)[0] === res.backUrl ) { parameters = res.backUrl.split('#'); parameters.push(eventData.redirectParameters.join('&')); res.backUrl = parameters.join('#'); } self._redirect(res.backUrl); return; } if (res.messages) { $(self.options.messagesSelector).html(res.messages); } if (res.minicart) { $(self.options.minicartSelector).replaceWith(res.minicart); $(self.options.minicartSelector).trigger('contentUpdated'); } if (res.product && res.product.statusText) { $(self.options.productStatusSelector) .removeClass('available') .addClass('unavailable') .find('span') .html(res.product.statusText); } self.enableAddToCartButton(form); var popup = $('<div class="add-to-cart-modal-popup"/>').html($('.page-title span').text() + '<span> has been added to cart.</span>').modal({ modalClass: 'add-to-cart-popup', title: $.mage.__("AJAX POPUP"), buttons: [ { text: 'Continue', click: function () { this.closeModal(); } }, { text: 'Checkout', click: function () { window.location = window.checkout.checkoutUrl } } ] }); popup.modal('openModal'); }, /** @inheritdoc */ error: function (res) { $(document).trigger('ajax:addToCart:error', { 'sku': form.data().productSku, 'productIds': productIds, 'productInfo': productInfo, 'form': form, 'response': res }); }, /** @inheritdoc */ complete: function (res) { if (res.state() === 'rejected') { location.reload(); } } }); }, }); return $.mage.catalogAddToCart; } }); |
Magento 2 Update Cart Quantity Ajax
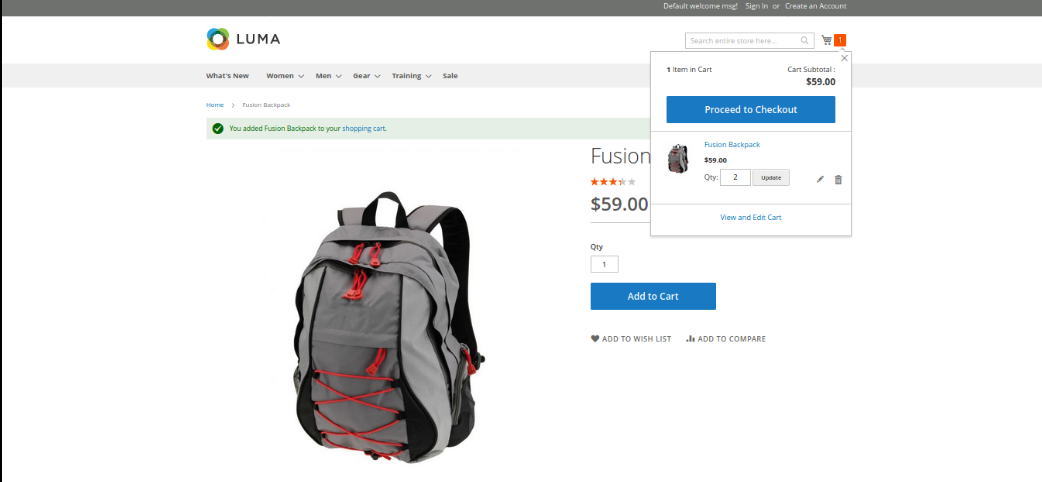
To Update Cart Quantity using Ajax, This functionality is given by default magento. To check update cart quantity using Ajax follow below steps:
Step 1:
First of all add any product in product page or category page.
Step 2:
Now,Check Qty option in Mini Cart.
Step 3:
Now,Update value of quantity and its update without page refresh.
Enable Or Disable Ajax Add To Cart
Magento 2 disable ajax add to cart is used to speed up the ordering process. You need to disable it on the product page and redirect customers directly to the checkout page. To disable the Ajax Add To Cart Functionality ,Follow below steps:
Step 1:
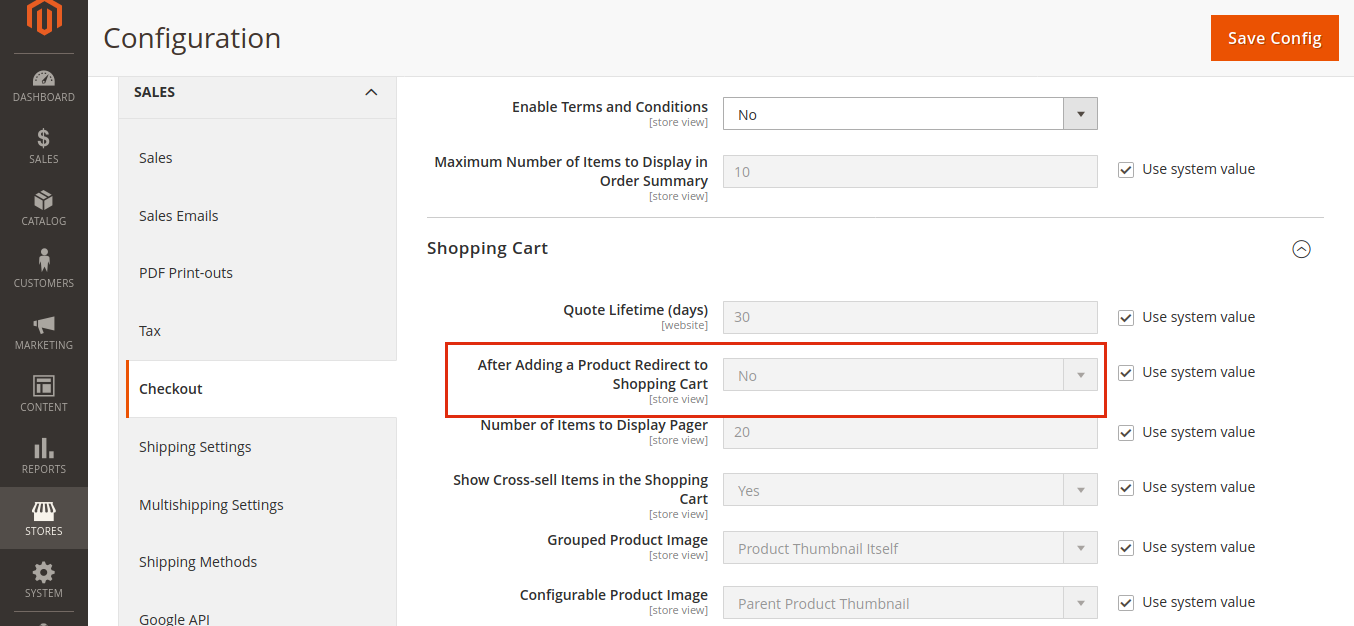
On the admin sidebar, go to Stores > Settings > Configuration.
Step 2:
In the left panel, expand Sales and choose Checkout.
Step 3:
Expand the Shopping Cart section.
Step 4:
If the setting is for a specific store view, choose the store view where the configuration applies. When prompted, click OK to continue.
Step 5:
In the After Adding a Product Redirect to Shopping Cart section, choose:
1.Yes to enable redirection to the shopping cart page immediately after a product is added to the cart. (thus, AJAX is disabled)
2.No to disable redirection to the shopping cart right after a product is added to the cart. (thus, AJAX is enabled)
Step 6:
Save configurations.
How to enable ajax for add-to-cart button of product widgets on home page?
You have to override addtocart.phtml file:
app/design/frontend/vendorname/themename/Magento_Catalog/templates/product/view/addtocart.phtml
Now Just Replace "bindSubmit": false to "bindSubmit": true
|
<script type="text/x-magento-init">{"#product_addtocart_form": { "catalogAddToCart": { "bindSubmit": false } } } </script> |
to
|
<script type="text/x-magento-init">{"#product_addtocart_form": { "catalogAddToCart": { "bindSubmit": true } } } </script> |
Make sure you have to set No from Store->Configuration->Sales->Checkout->Shopping Cart->After Adding a Product Redirect to Shopping Cart to No.
Conclusion:
We hope above guideline helps you to clearly understand How to Add product to cart using Ajax programmatically in Magento 2 .We have created a Magento 2 Ajax Add to Cart Extension for this solution.In case of any kind of problem with the above code implementation, you can contact us or let us know in comment section.