Graphql Magento 2

Graphql in Magento
There has been a rapid rise PWA in magneto, and there is a requirement of getting a smaller amount of the data and also to make less API requests. Query language of the GraphQL makes it absolutely possible by enabling the requestors to the requests a limited to an extended subset of the attributes to get returned of around an entity (smaller response) and let you chain the requests. GraphQL is used by the magneto to proffer an alternative to the SOAP and REST web APIs for front end development.
How to access GraphQL:
GaphQL is an in-browser tool that is used to write and test GraphQL queries. It is available to download an addon from your browser’s app store. ChromeiQL extension is supported by Google Chrome whereas Altair GraphQL addon is used for both Firebox as well as Chrome.
To use GraphQL, you need to set GraphQL endpoint by entering your site URL suffix with GraphQL {. {YOUR_SITE_FRONT_URL}/graphql in the URL bar and then click on Set endpoint.
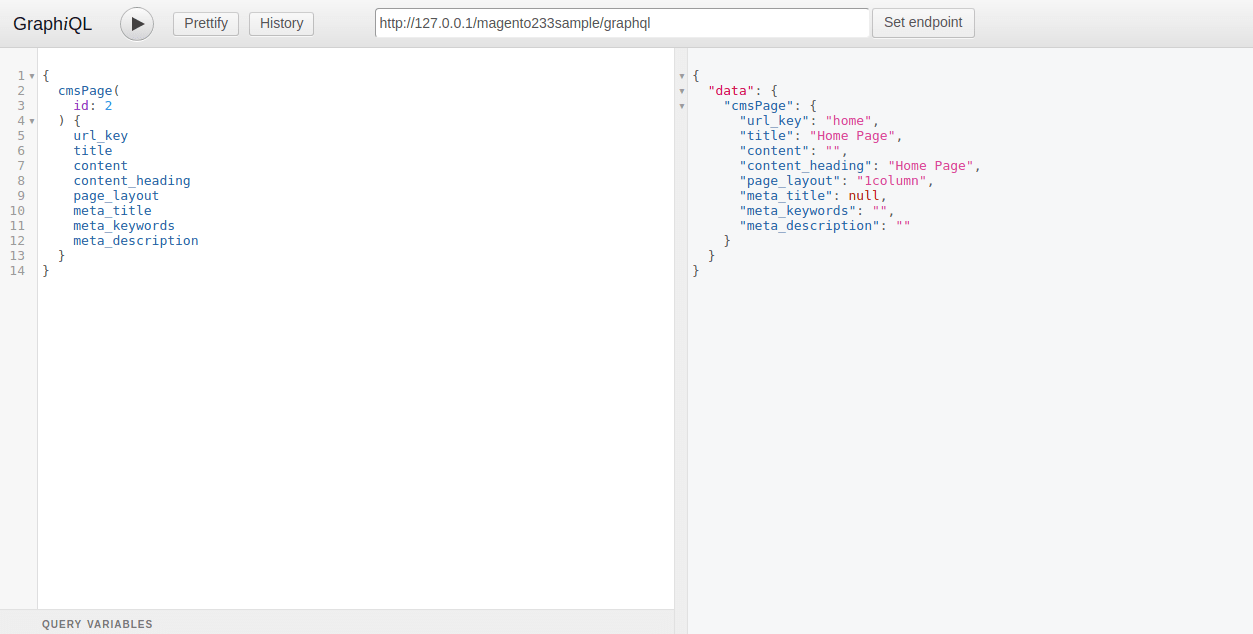
You can check in the below screenshot, For Magento 2.3 localhost, we have passed URL for GraphQL as http://127.0.0.1/magento233sample/graphql

Here, we have tested the CMS Page GraphQI demo for access CMS Page data by using GraphQL. Magento 2.3 provides a new module called MAgento_CMSGraphQI which is responsible for CMS page GraphQI Query languages. So, you can get a page and block’s data using GraphQL.
Body for CMS Page request in GraphQL
            {
              cmsPage( id: 2 ) {
              url_key
               title
               content
               content_heading
               page_layout
               meta_title
              meta_keywords
               meta_description
             }
           }
In the above code, Id is your CMS page id, we have put id=2 and 2 is homepage id for CMS page. On the basis of the Id you got the response which you have passed the field in the body.
According to Magneto Devdocs, you can access the GraphQL feature only in Magento developer mode. If you don’t have the same, then you can set the mode using CLI,
php bin/magento deploy:mode:set developer
There are a number of core modules used GraphQL query language in Magento 2.3. Have a look:
- CatalogInventoryGraphQl
- CatalogUrlRewriteGraphQl
- BundleGraphQl
- CatalogGraphQ
- ConfigurableProductGraphQl
- CustomerGraphQl
- DownloadableGraphQl
- EavGraphQl
- GroupedProductGraphQ
- TaxGraphQl
- ThemeGraphQl
- UrlRewriteGraphQl
- WeeeGraphQ
Magento 2.3 GraphQL state as of now.
Graphql was implemented by Magento to provide an alternative and SOAP and REST web APIs for the development of the front end. It was introduced with the Magento 2.3.0. The coverage of the GraphQL as also increased with the release of every Magento.
We can define schema patches and data since the magento 2.3 GraphQL schema. This methods enables better control over various changes in the data. Magento 2.3 offers a bunch of features like PWA, multi-store inventory, GraphQL and a lot more features. Some of the features will be available in the GraphQL Magento 2, such as Magento payment, etc. You can simply download the Magento 2 GraphQL nd Magento 2.3 beta version from Github.
How to use GraphQL?
Let’s have a look at the concepts of GraphQL. We will talk about the step by step process of how to implement GraphQL magneto 2.
-
You need to create this file for your registering your module. app/code/Test/TestGraphQl/registration.php
\Magento\Framework\Component\ComponentRegistrar::MODULE, 'Mageants_DemoGraphQl', __DIR__ ); -
Coming to the second step, for defining the module you have to create the app/code/Test/TestGraphQl/etc/module.xml and then you are good to go with it.
<?xml version="1.0"?> <config xmlns:xsi="http://www.w3.org/2001/XMLSchema-instance" xsi:noNamespaceSchemaLocation="urn:magento:framework:Module/etc/module.xsd"> <module name="Mageants_DemoGraphQl"> <sequence> <module name="Magento_Sales"/> <module name="Magento_GraphQl"/> </sequence> </module> </config> -
Third step includes, initially, we have to define the Schema of the query. In this step of the process, we have to mention which fields and what type of data gets returned in the response. Talking about the Schema, it is a container of your type hierarchy that accepts the root types in the constructor and proffers several methods for getting the information about the type to your internal tools of GraphQL. The scheme comes with two types of roots:
- Query type, which is a surface of your read API.
- Mutation type, which is optional, It exposes write API by declaring all the possible mutations in your application.
Create schema.graphqls file, app/code/Mageants/DemoGraphQl/etc/schema.graphqls
              type Query
               {
                       salesOrder (
                         id: Int @doc(description: "Id of the Sales Order")
                      ): SalesOrder @resolver(class: "Mageants\\DemoGraphQl\\Model\\Resolver\\SalesOrder")
                   @doc(description: "The Sales Order query returns information about a Sales order")
                }
type SalesOrder @doc(description: "Sales Order graphql gather Data of specific order information") { increment_id: String @doc(description: "Increment Id of Sales Order") customer_name: String @doc(description: "Customername of Sales Order") grand_total: String @doc(description: "Grand total of Sales Order") is_guest_customer : Boolean @doc(description: "Specifies if this order was placed by Guest cusotmer") address_array: [String] @doc(description: "Array of order address types. It can have the following values: city, postcode,state") }Here, we have defined the description of each field which are used in GraphQL.
- id: Int @doc(description: “Id of the Sales Order”) map to Sales Order id as Int type
- customer_name: String @doc(description: “Customername of Sales Order”) map to Customer name as String Type
- is_guest_customer : Boolean @doc(description: “Specifies if this order was placed by Guest customer”) map to Boolean Type
- address_array: [String] @doc(description: “Array of order address types. It can have the following values: city, postcode, state”) map to Array of data type.
We are going to learn query types in the blog.
-
After this, you have to create a query resolver model class that is defined in Schema. In this method of the resolve, we just return the data of the customer, which is logged in.
We need to create SalesOrder.php file from defined resolver from above schema file SalesOrder @resolver(class: “Mageants\\DemoGraphQl\\Model\\Resolver\\SalesOrder”) @doc(description: “The Sales Order query returns information about a Sales order”)
Create file for below Path: app/code/Mageants/DemoGraphQl/Model/Resolver/SalesOrder.php
<?php declare(strict_types=1); namespace Mageants\DemoGraphQl\Model\Resolver; use Magento\Framework\Exception\NoSuchEntityException; use Magento\Framework\GraphQl\Config\Element\Field; use Magento\Framework\GraphQl\Exception\GraphQlInputException; use Magento\Framework\GraphQl\Exception\GraphQlNoSuchEntityException; use Magento\Framework\GraphQl\Query\ResolverInterface; use Magento\Framework\GraphQl\Schema\Type\ResolveInfo; ** * Order sales field resolver, used for GraphQL request processing */ class SalesOrder implements ResolverInterface { public function __construct( \Magento\Sales\Api\OrderRepositoryInterface $orderRepository ) { $this->orderRepository = $orderRepository; } /** * @inheritdoc */ public function resolve( Field $field, $context, ResolveInfo $info, array $value = null, array $args = null ) { $salesId = $this->getSalesId($args); $salesData = $this->getSalesData($salesId); return $salesData; } /** * @param array $args * @return int * @throws GraphQlInputException */ private function getSalesId(array $args): int { if (!isset($args['id'])) { throw new GraphQlInputException(__('"sales id should be specified')); }return (int)$args['id']; } /** * @param int $orderId * @return array * @throws GraphQlNoSuchEntityException */ private function getSalesData(int $orderId): array { try { $order = $this->orderRepository->get($orderId); $shippingAddressArray = []; $shippingAddressArray['shipping_name'] = $order->getShippingAddress()->getData('firstname').' '.$order->getShippingAddress()->getData('lastname'); $shippingAddressArray['city'] = $order->getShippingAddress()->getData('city'); $shippingAddressArray['postcode'] = $order->getShippingAddress()->getData('postcode'); $shippingAddressArray['state'] = $order->getShippingAddress()->getData('region'); $orderData = [ 'increment_id' => $order->getIncrementId(), 'grand_total' => $order->getGrandTotal(), 'customer_name' => $order->getCustomerFirstname().' '.$order->getCustomerLastname(), 'is_guest_customer' => !empty($order->getCustomerIsGuest()) ? 1 : 0, 'address_array' => $shippingAddressArray ]; } catch (NoSuchEntityException $e) { throw new GraphQlNoSuchEntityException(__($e->getMessage()), $e); } return $orderData; } } -
In order to install this module, you need to run the following commands.
- – php bin/magento setup:upgrade
- – php bin/magento cache:flush
You can also check the query of your GraphQL with the help of a chrome extension, which you can easily install in the chrome. The name of the extension is ChromeIQL.
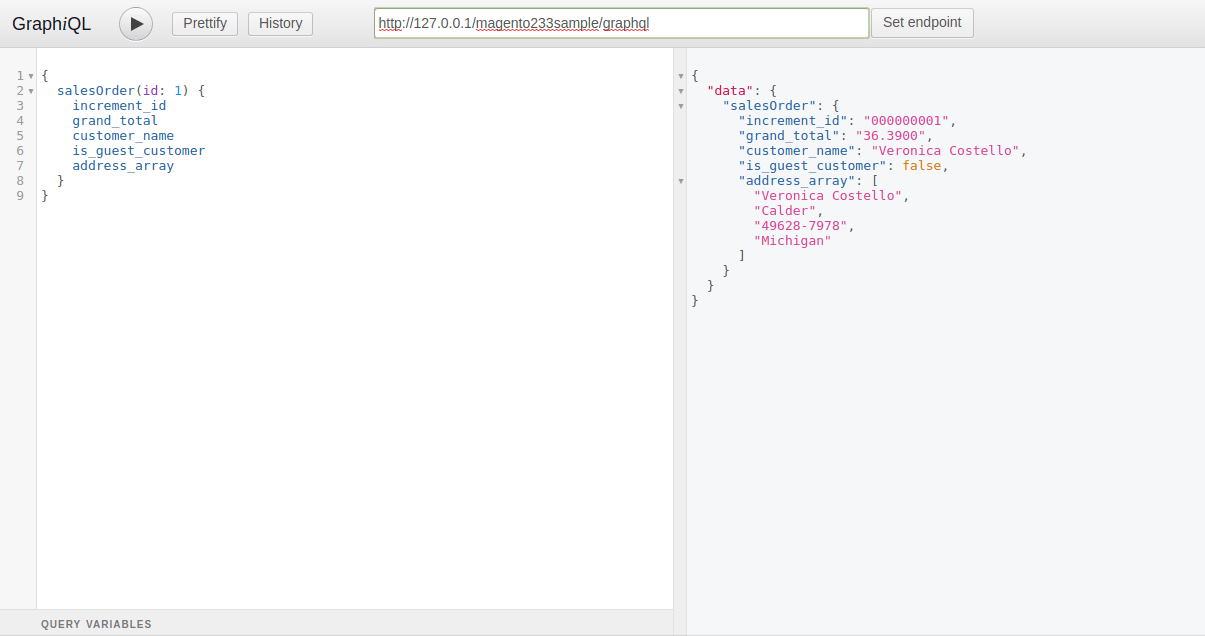
Check Using type query in ChromeiQl by, http://127.0.0.1/magento233sample/graphql where http://127.0.0.1/magento233sample is your store URL.

In Request Body, You need to pass required data for Sales Order, Where id is your Order id.
                {
                  salesOrder(id: 1) {
                       increment_id
                      grand_total
                      customer_name
                      is_guest_customer
                       address_array
                   }
               }
The result will be,
                {
                   "data": {
                      "salesOrder": {
                         "increment_id": "000000001",
                          "grand_total": "36.3900",
                         "customer_name": "Veronica Costello",
                         "is_guest_customer": false,
                         "address_array": [
                             "Veronica Costello",
                             "Calder",
                            "49628-7978",
                            "Michigan"
                          ]
                      }
                   }
               }
If you wish to check the query, first, you have to set an end point.
<magento root url>/graphql
-
Magento use the module of Graphql to manage the custom predefined GraphQL quires. You can witness your custom queries after you set the end point in the section of the document explorer.
That’s enough for now. Hope you understand the concept of GraphQL in Magento 2.3. If you have any doubts related to this example or anything else let us know in a comment section.

