
Magento 2 Go-Live Checklist: Key Tasks For a Seamless Store Launch

Magento is rapidly becoming a merchants' preferred platform owing to its features, scalability, and flexibility. Magento is a popular online sales channel enterprises use that integrates with their accounting or ERP systems. The best reason why small and medium businesses are going with Magento is that it gives them full control over sales, fulfilment, inventory, procurements, and more. A whopping 0.7% of the internet's websites are powered by Magento today.
Whether you are a small business or big corporation, you probably have no idea where to start when it comes to managing a Magento website.
Whether you are a small business or big corporation, you probably have no idea where to start when it comes to managing a Magento website.
The launch of a Magento 2 website involves a lot of work. Upon release, ensuring there are no bugs or issues requires close monitoring and administration. Ahead of the go-live process, double-check to ensure everything is configured properly.
Maintaining a Magento 2 store is a challenging endeavour, requiring significant effort and time. To avoid a post-launch problem, it is essential to establish a comprehensive checklist of possible mistakes that may occur. In this blog post, we will discuss a few points to which you need to pay attention before launching your store. Here's a checklist for Magento 2 Go-Live!
Magento 2 Go-Live Checklist: Crucial Tasks to Complete Before Launching
To launch a new Magento 2, there will be a lot of work before you can launch the site. Launch day needs everything to be perfect. Make sure you read the checklist, so you don't miss anything. To launch a Magento 2 website, you should review these checklists first.
System Requirement
The first task of Magento 2 Go-Live Checklist is system requirement. Ensure that your system has all the necessary software for Magento 2, emphasizing the software version.
Magento regularly provides a complete list of the required software to choose the correct version of Magento 2.x next to the logo. Without the right software and version, Magento will probably crash at some point, so make sure you have them. Magento upgrade service will help to upgrade your store to latest version.
Create a Favicon
Favicons are small icons that identify your brand or website. There is a tab icon and an address bar where you can see it.
There is a widespread use of favicons on Google's mobile search. It is still experimental to use the desktop search favicon.
The favicon serves as a visual representation of the brand. It enhances the visibility of your website in search engine results. Additionally, it improves browser navigation. Magento 2 favicons can be customized as follows:
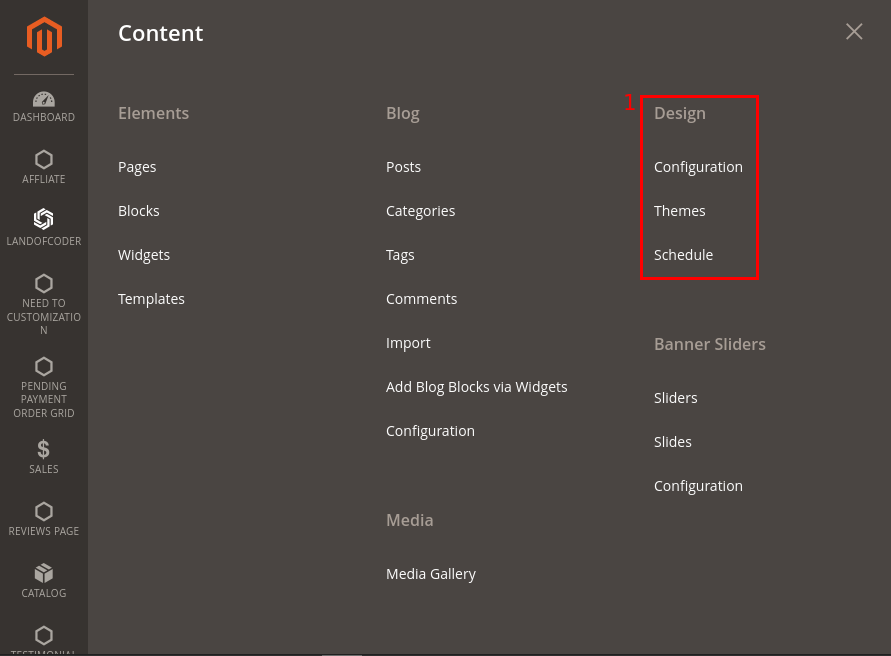
- Navigate to Content > Design > Configuration.
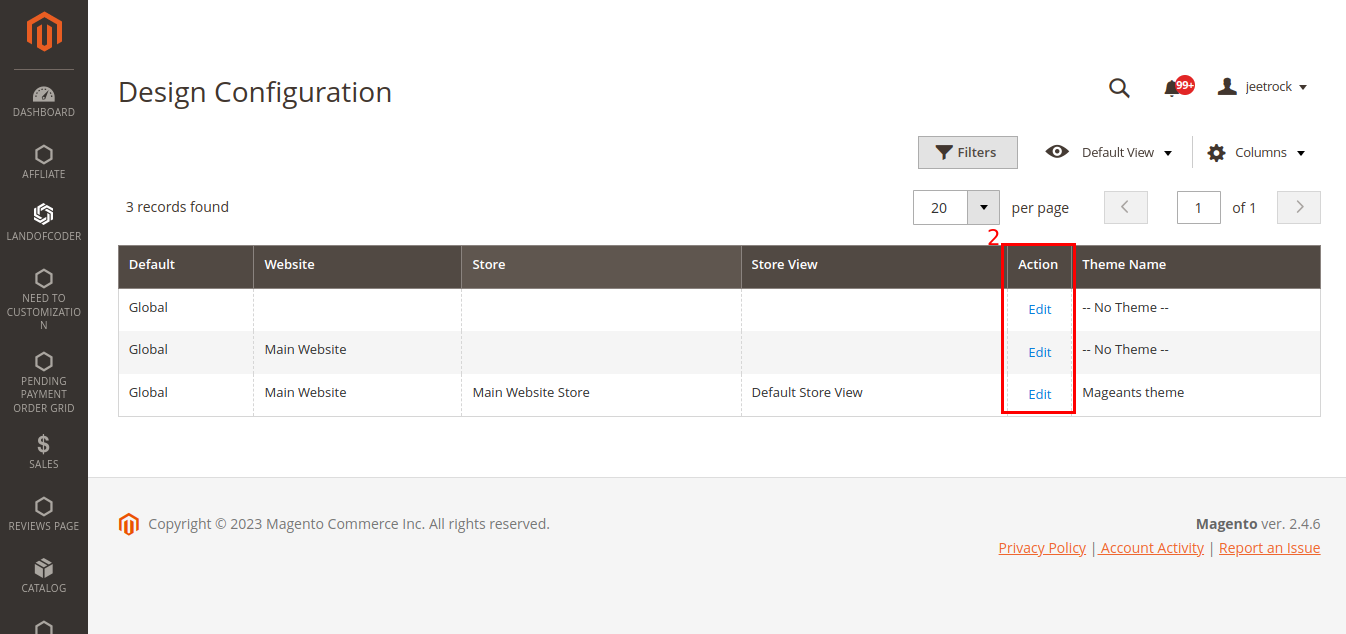
- Choose the level you want the favicon configured in the scope grid. To make changes, click Edit.
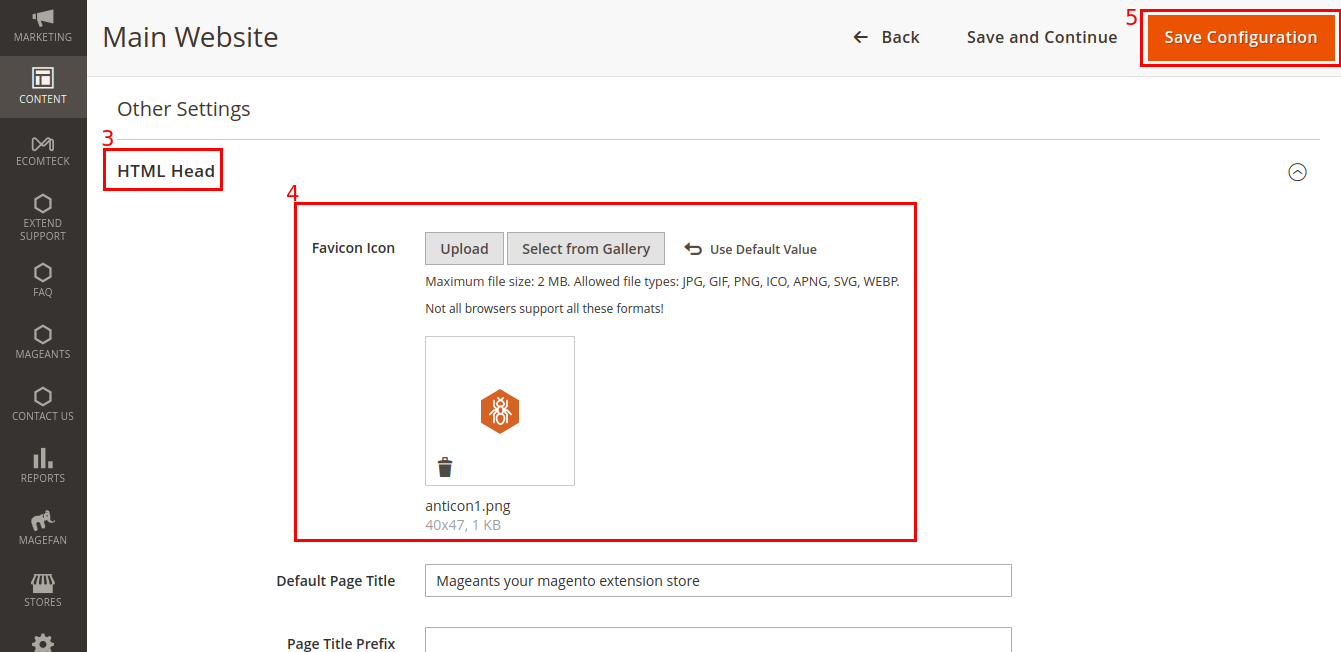
- Make sure the HTML Head is expanded under Other Settings.
- In the Favicon section, click Upload. Choose a custom favicon file.
- Right-click to save your configuration.
Check the Store URLs

Important task of Magento 2 go-live checklist is store URLs. Every Magento shopfront must have a base URL associated with it. Additionally, the administrator has access to an admin URL.
Within Adobe's store, some variables define internal links. Base URLs are used for defining these. As a result, the store's location can be moved without updating the links. Make sure the URLs are configured correctly and working. Consider the following:
- The status of URLs is 200 OK.
- Verify the status of the www and HTTP/HTTPS.
- It is necessary to update the base URLs stored in core_config_data. If they don't have access to the staging site, they may be redirected back there.
- Check the URLs of your stores to see if they are easy to use.
- Make sure the URLs of the catalog and products are correct.
Set up SSL
An SSL certificate is required for the Magento 2 store owner, as well as a secured frontend URL. Google uses ranking signals to determine your website's ranking, including security and https. Configure SSL in your Magento 2 store as follows: Choose Stores > Configuration > General > Web > Base URLs (Secure) > URL with https.
301 Redirects
It is important to double-check all the redirects you have in your store and to fix any broken ones as soon as possible.
404 Error Page
Ensure your website contains a 404 error page. It won't harm the store, so don't worry. Google confirms that 404 error pages are not harmful.
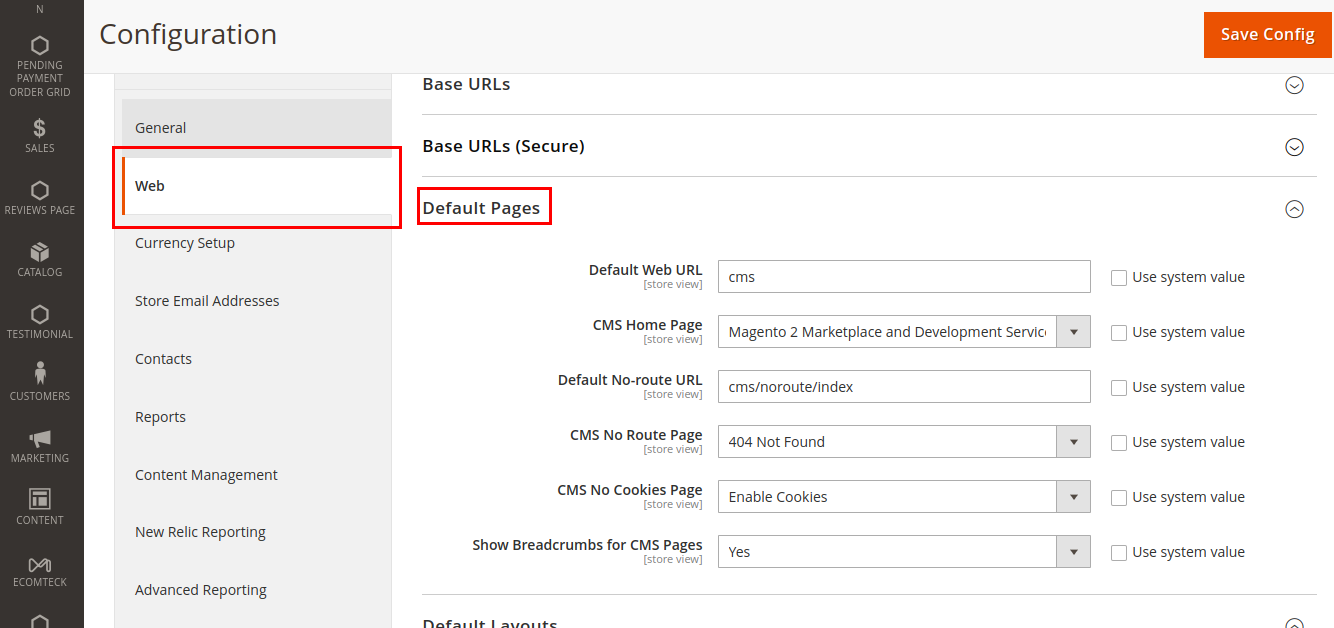
An error 404-page helps calm your customers when your site is down, since it lets them know the problem is only temporary or simply being repaired. The steps for configuring 404 error pages in Magento 2 are as follows:
- Click on Stores > Configuration > Web > Default Pages
- Optimize the Magento 2 404 page for user-friendliness by reviewing all settings
Also read;- Innovative Maintenance Page Examples And Best Practices
Check out the third-party modules.
Third-party modules are easy to integrate with Magento. Your website may have been enhanced with modules such as live chat and reviews. Alternatively, shipping, marketing and tax extensions may enhance the functionality of the store.
Some extensions cannot be used without their license keys. To ensure the extensions work, ensure the key is valid before going live.
Make sure the site is free of unnecessary modules. It is possible to disable some Magento functions that you are not using.
Email Setups
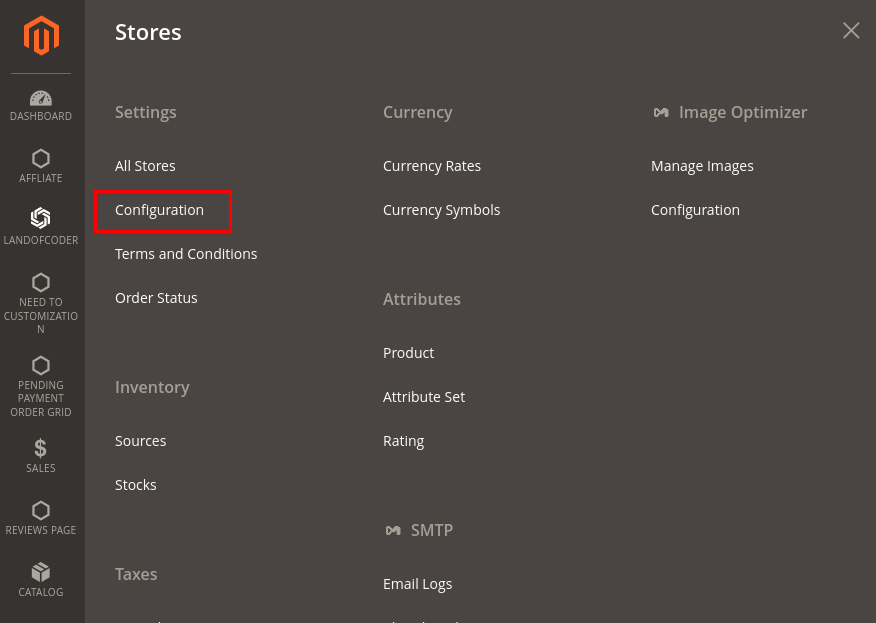

Before launching Magento 2, Email Setups are another essential step. Ensure your Magento 2 test Email IDs are updated with your business email addresses in the staging environment. You can easily do this by going to Stores > Settings > Configuration > General > Store Email Addresses in settings.
Go to Stores > Settings > Configuration > General > Contacts to change the email address. Furthermore, ensure that you address transactional emails. These emails use a different logo than the default image. If your theme directory saves your desired image as logo_email.gif, then you should double-check that it is there.
Enable the Cron

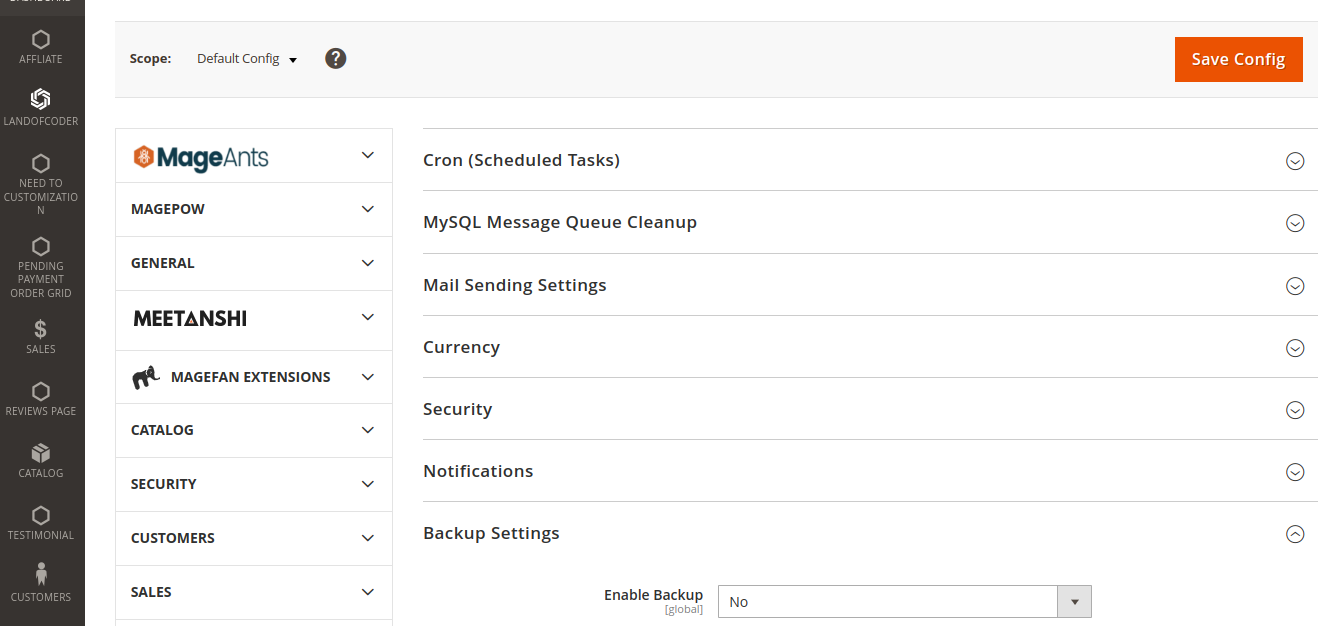
A cron job runs a script on a schedule to perform Magento tasks. Magento has many features that require cron jobs to run at least once. Crons can be configured from the admin panel.
Cron may be required for the following features:
- Emails
- Catalog price rules
- Newsletters
- Generating Creating
- Customer Alerts for price changes or back in stock.
- Reindexing
- Currency rate updates
Make sure your store's cron is configured before going live. Select Store > Settings > Configuration > Advanced > System.
A cron job can be modified based on your needs. Even after the site has gone live, the cron job updates will continue to be done regularly.
Checkout Process

One of the most crucial steps before launching your Magento 2 store is checking the checkout process. You can choose between a one-page checkout and a guest checkout in your Magento store.
One-page checkouts allow customers to fill out a single form and complete their purchase on a single webpage. Most stores love it because it's simpler and faster than guest checkout.
Guest checkout, on the other hand, involves multiple steps for entering their names, addresses, and payments. It is suitable for stores that sell to customers who do not have any experience using the website.
Google Tools Integration


Integrating Google Analytics in Magento 2 from the start is crucial for tracking growth and analysing data. If you plan to use Google Ads to market your business, Magento 2 also offers API integration. Go to Stores > Settings > Configuration > Sales > Google API and configure both settings.
Remove Test Data
Orders and products may have been created as test data. Data from tests is useful for verifying the functionality of a store. Sites are tested with it during development.
Delete all test data before you take your site live. By doing so, the unnecessary data is removed. The following may be included in the test data:
- Products & Categories
- Customers & dummy accounts
- Wish Lists
- Reviews
- Search results
- Invoice & shipment data.
Enable Cache

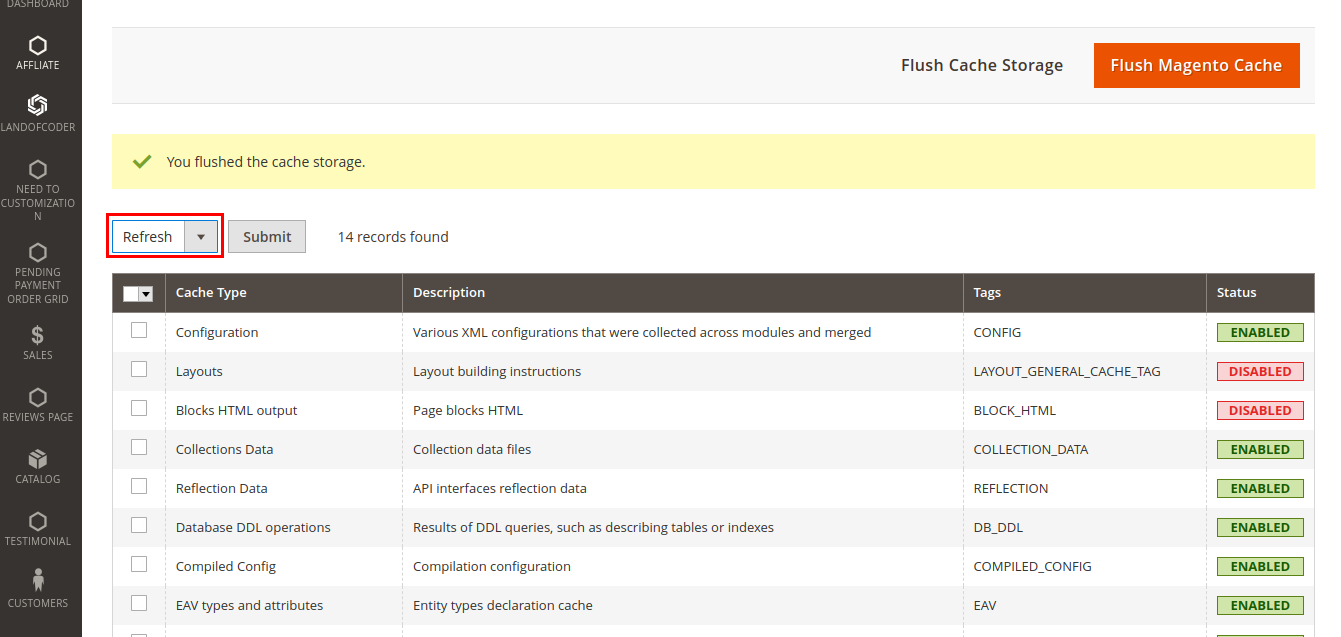
Magento cache improves page loading speed and reduces server load. Magento defaults to caching. It is possible to disable it during the development process. Before going live, enable caching to prevent performance dips. Caching can be configured in Magento's Admin Panel under System > Cache Management. From here, you can refresh & enable caching.
Content Delivery Network (CDN)
Ensure that your CDN delivers website content to users in different regions with minimal latency so that they can enjoy optimal website performance. The most well-known CDN providers include CloudFlare, Amazon CloudFront, Fastly, and many more.
Newsletter Subscriptions

The best way to avoid awkward situations with your customers is to ensure that your newsletter subscription system enables subscribers to subscribe and unsubscribe easily. You can use newsletter popup extension for this.
Conclusion
These were top-notch, and must-know Magento 2 Go Live checklist. Launching the Magento 2 store throws lots of challenges, but following this list will allow you to tackle all the challenges that come your way.
If you need expert assistance to help you with the launch, contact us today, and we will help you implement the launch in the best way possible.
