
How To Setup Multi Store In Magento 2
All the stores included may share the same domain, can also be set up as a sub domain of the same domain or can be an entirely different domain along with the possibility of stores sharing the same backend for easier administration. The above shown details about the domain are included under Magento 2 Multi Store Categories. Magento 2 provides a platform that is very helpful to create multiple stores; moreover, it renders some advantages over having various e-commerce websites. These advantages can be shown below;
- Since there is only a single payment gateway present then you can easily save costs of setting multiple gateways.
- Responsive frameworks.
- Users don’t need to split the data across numerous websites as they can efficiently keep a single customer database.
- Templating and standardization, which includes boilerplate text for terms, conditions, etc.
- Unified support all around the store which can be easily taken with the help of various third party extensions and integrations.
The above shown amazing benefits can be easily added to your store by simply following the steps to setup Magento 2 Multiple Stores Different Domains. Additional to this, you can easily add multiple websites for every store which you want to configure.
Steps To Setup Multiple Stores In Magento 2
The setup of multi stores in Magento 2 can be done in the exact same manner as we did in Magento 1. Although, we know that Magento 2 and Magento 1 are totally different, and due to the change of file system, it will be difficult for those people who have recently started development in Magento 2 Multiple Domains Single Store.
- Step 1: Select the store domain
- Step 2: Add the new store
- Step 3: Add a default store view
- Step 4: Setup the store URL
These above shown steps to setup Multiple stores in Magento 2 can be explained in details, and is shown below;
Step 1: Select The Store Domain
The very first step to creating multiple stores in Magento 2 includes the selection of the location, where you want to store. The stores can share the same domain or can have a sub domain of their same domain or can have a distinctively different domain. For each of the store, you must have to follow the following steps.
- You don’t have to do anything for the placement of store one level below the foremost domain.
- Compose a subdomain of your head domain.
- Configure an entirely different primary domain.
Step 2: Add The New Store
The second step of theMagento 2 Multi Store Setup includes the addition of a new store, which can be done with the help of the following steps;
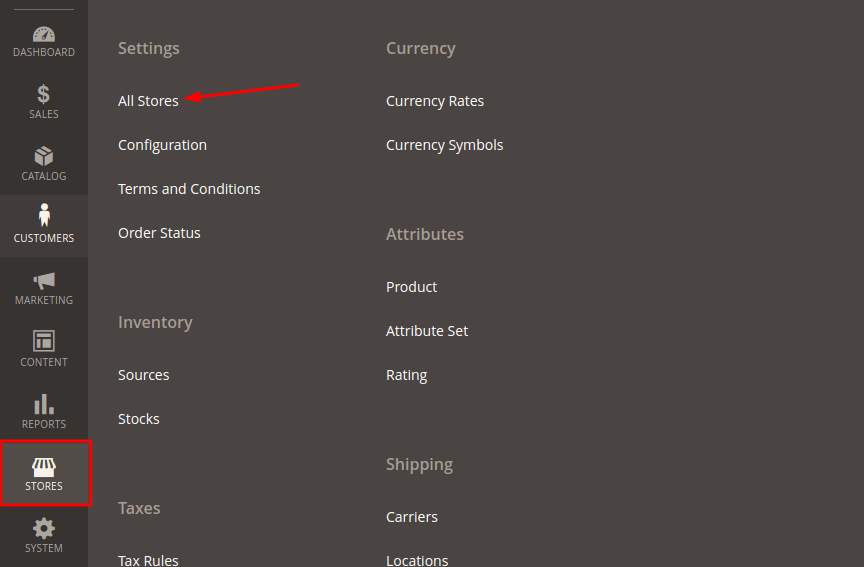
- Go on the Admin panel, then go to “Stores”, select “Settings” option and then select “All Stores”.
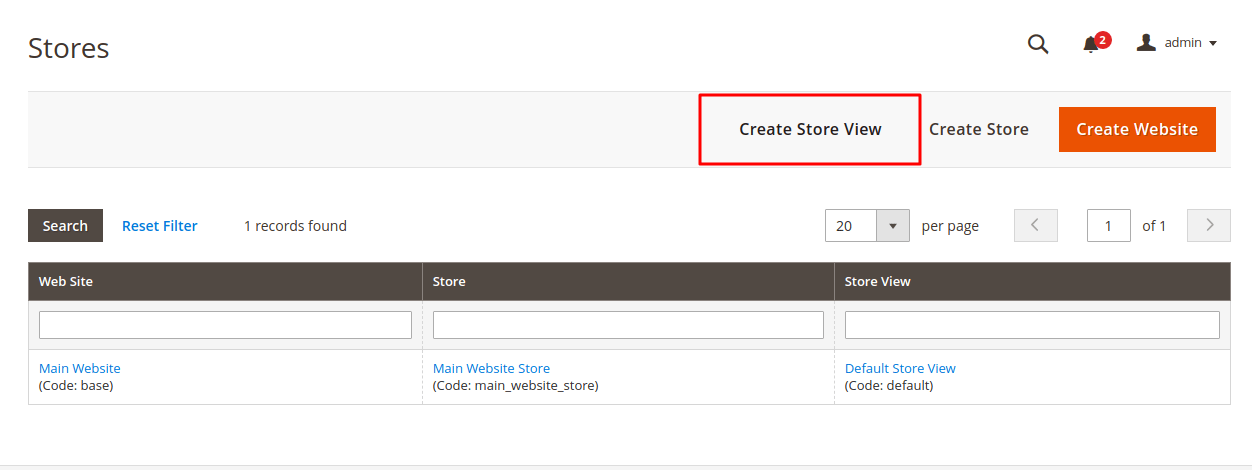
- Click on the “Create Store” panel, and then follow the below steps:
- Use the default option of “Main Website”, only if you have one website. Else, you have to select the “Website” which is the parent of the new store.
- Fill the name of the new store with the help of the “Name” option, which is taken just for the internal reference.
- In the “Root Category” option, you have to set the root category, through which the main menu of the new store is managed.
- Select “Save Store” option to complete the addition of new stores.
Step 3: Add A Default Store View
To add a default store view you must create a store view where you can easily add various store view information. By creating a default store view in Magento 2 Multi Store Different Themes can be managed.
-
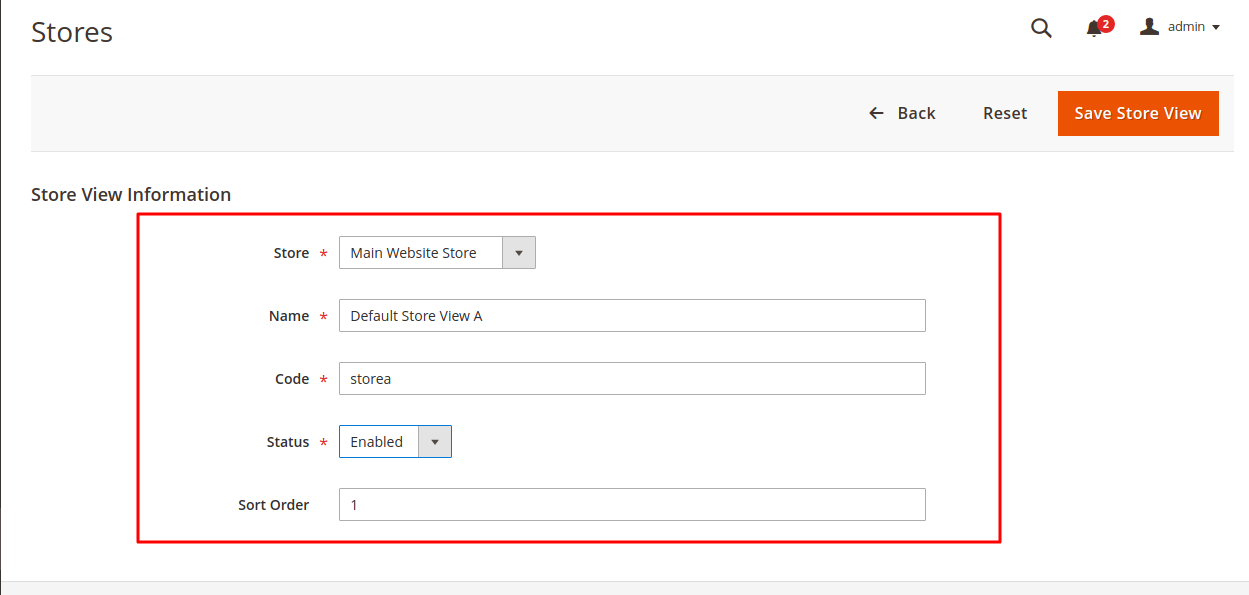
Select the “Create Store View” option, from which you can enhance the store view by the following steps;
- Select the “Store” option and simply assign the store.
- Select the “Name” option, through which you can easily set a particular name for the store.
- By selecting the “Code” option, type a particular code with lower characters.
- First, select the “Status” option and after that choose “Enabled”.
- Select “Sort Order” option, through which you can easily specify the position of your new store.
- To save all the settings, just click on “Save Store Settings”.

Step 4: Setup The Store URL
Select Magento 2 “Add Store Code To URLs” option to configure the store URL with the help of the following steps;
- In the Admin Panel, go to the “Stores” option, then select “Settings” option and then finally click on “Configuration”.
- Go to the left panel and then select the “Web” option, which is present under “General”.
- Go to the upper left corner and then check the new store added with the help of “Store View” option.
- To verify scope switching, you must select “OK”.
- Open the Base URLs section and then,
- Website checkbox needs to be cleared, which is available next to the “Base URL” option.
- One would have to change the “Base URL” of the store.
- Open the “Secure Base URL” option and then set the store’s secure URL.
- To complete the process click on the option “Save Configuration”.
Caution:
- Store URL must be unique.
- Not for international sales due to some currency issues.
